|
|
|
|
| HOW TO DIVERSIFY A 5.1 SONG WITH VARIOUS DRUMS |
|
|
|
Music Morpher lets you edit 5.1 audio files as simply as stereo and mono. Editing implies copying, cutting pasting or mixing audio data either for each channel or for the whole song. In addition, you can apply any effects from the Effects Library to your channel selections.
In this tutorial, you will open a 5.1 drumfree piece of music in the edit mode, apply various drums to each channel and finally save your edit to a new file.
Step 1: Open a 5.1 audio file in the editor mode
Click the Editor button (1) to switch to the Editor mode. In the File menu click the Open command (2). |

The Open dialog-box will pop up. Select your 5.1 audio file and click Ok. As the result, the data window will display your song in six channels as it’s shown below:

Note: Mind that the audio file you open should be almost free of drums to keep the contrast between the edited file and the original one
Step
2: Apply different drums to each channel
In the data window, navigate the mouse pointer over the top channel waveform, until the mouse pointer changes its view to FL – this sign corresponds to the Front-Left speaker. Double click the waveform to get the whole channel selected. Then click the Beat Tracking effect on the Effects Library pane.
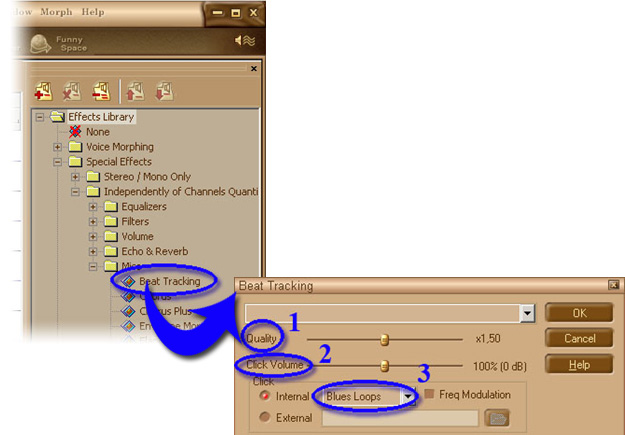
In the dialog-box set the Quality Parameter (1) to 1.5, leave the Click Volume (2) at 100% and in the Internal combo-box (3) select "Blues Loops". Click Ok
|
|
| Now your front-left channel has obtained the additional beats. Find the Front-Right channel (FR) and apply the Beat Tracking effect with the same parameters. |
| |
| Then find the Front-Center channel (FC) and apply the Beat Tracking with the following parameters: |
- Quality (1) = 1.5
- Click volume (2) = 64%
- Internal (3) = "Tech Snare"
|
| For the SubWoofer (LF) channel set Beat Tracking parameters as below:: |
- Quality (1) = 1.5
- Click volume (2) = 100%
- Internal (3) = "Bass Drum"
|
| For both Rear-Right (BR) and Rear-Left (BL) channels apply the Beat Tracking with the following parameters: |
- Quality (1) = 1.5
- Click volume (2) = 100%
- Internal (3) = "Expanded HiHat"
|
|
Now all of your channels have gained extra beats. Click the None button to prevent the Beat Tracking effect from overlaying your edit.

Then click the Play button to start playing your edited 5.1 song.

Note: Of course, selecting beats for a particular channel depends on the music played in this channel and your taste, so you may try different drum types than those listed in our tutorial.
Step
3: Save your edited song to a new file.
After all the editing is done and you are satisfied with the result, you might want to save your composition to a new file. For that, click the Save As command in the File menu and in the appeared dialog-box type in your new file name and set the file type as Ogg Vorbis. Click Ok. The Sound Format dialog-box will come up. In the Channels combo-box select "5.1 Surround Mode" and leave other fields intact.

Click Ok and wait until Music Morpher finishes with the saving procedure. After that, you are ready to make your friends enjoy with your new 5.1 composition!
|
|
|
| |
|