|
|
|
|
| HOW TO RECORD A KARAOKE SONG (ADVANCED) |
|
Unlike project 3,
which guides you to record your karaoke singing in a simple way,
this project will show you how to capture karaoke songs in a more
advanced way assuring a better and more enjoyable quality .
|
|
Step 1: Adjust the Windows Volume Control
| • |
Double click on the
small speaker  in the right corner of your taskbar to open the Windows Volume
Control. in the right corner of your taskbar to open the Windows Volume
Control. |
| • |
Click the Options menu and choose Properties. |
| • |
The Properties window
now comes up. Check Recording then Stereo Mix in the
list of volume controls underneath. Click OK. |
|

The Recording Control
now appears. Select Stereo Mix and lower the volume slider
for a good recording result. Then close the window.

Step 2: Record the background music
| • |
Open the karaoke song
(usually from a karaoke CD/DVD) by a media player (such as Windows
Media Player or PowerDVD, etc). |
| • |
Open
AV Music Morpher Gold and click the Recorder button  on the Player panel. The Record dialog will come up. on the Player panel. The Record dialog will come up. |
|
|
 |
| |
|
| • |
Play the karaoke song
and press the red button
on the Record dialog of AV Music Morpher to begin recording the
background music. Press this button again when you want to stop the
process. |
| • |
Use the Play and Stop buttons to play back your
recording. If you are satisfied with the result, click Save.
The Save As dialog will appear, choose a desired file
name and audio format. If you are not satisfied with
the result, record again. We may call the music file here File
1. |
|
Step 3: Record the singing voice
Repeat Step 1 (Adjust
Windows Volume Control) but select Microphone in the Recording Control window.

Play the karaoke song
and start singing into the microphone. Press the red button
on the Record dialog of AV Music Morpher to begin recording your
singing voice. Press this button again when you want to stop the
process.
Use the Play and Stop buttons to play back your
recording. If you are satisfied with the result, click Save.
The Save As dialog will appear, choose a desired file
name and audio format. If you are not satisfied with
the result, record again. We may call the voice file here File 2.
Step 4: Mixing the singing voice with the background music
| • |
Click the Editor tab on the module bar of AV Music Morpher. |
| • |
The Editor now comes
up. Click New Multitrack Session on the toolbar to open multitrack
window. |

| • |
Right click on the track 1, choose Add New Clip From File to import the Music file (File 1) into AV Wave
Editor. |
| • |
Right click on the track
2, choose Add New Clip From File to import the Voice file (File 2) into AV Wave Editor |
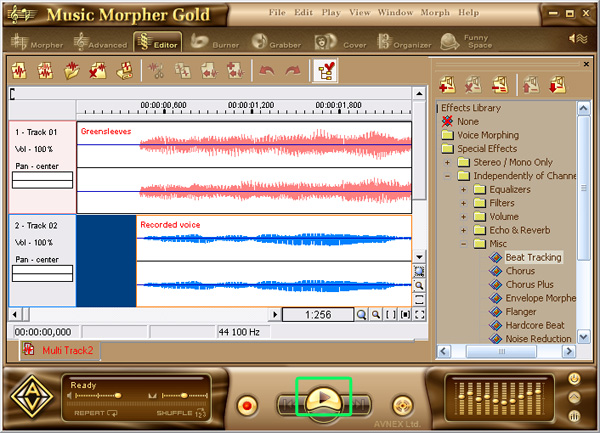
| • |
Click Play button to
hear the result. If the voice doesn't meet the sound, click the
track and hold the right mouse button to move the track up or down. Let the
music be playing when you moving the track to hear the result
immediately. |
| • |
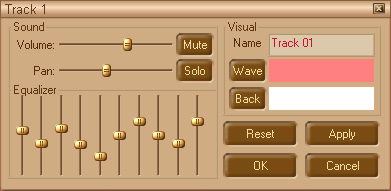
To add just the volume, pan, equalizer of each track, right click on the track
you want to adjust and choose Track Properties. At the track
properties dialog box you can add just the volume, the pan and the
equalizer to meet your desire. |
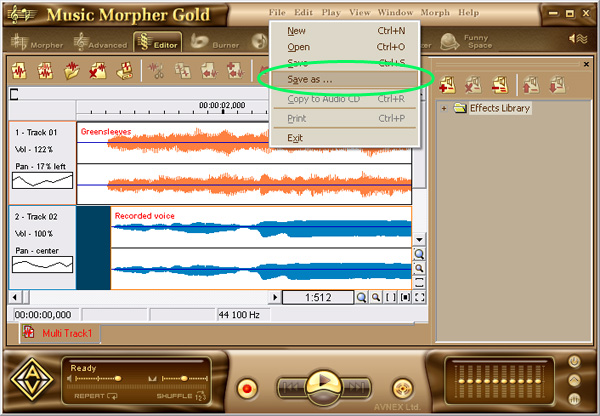
Click File on the menu bar and choose Save as to save your
work. Choose mp3 format to save your song.
Note: You may edit both files with available editing tools,
such as copy, cut, paste, or apply more effects to improve music
quality and make your song more fascinating.
|
|
|